Tag Archives: Debian

GPS on Orange Pi 2G IOT

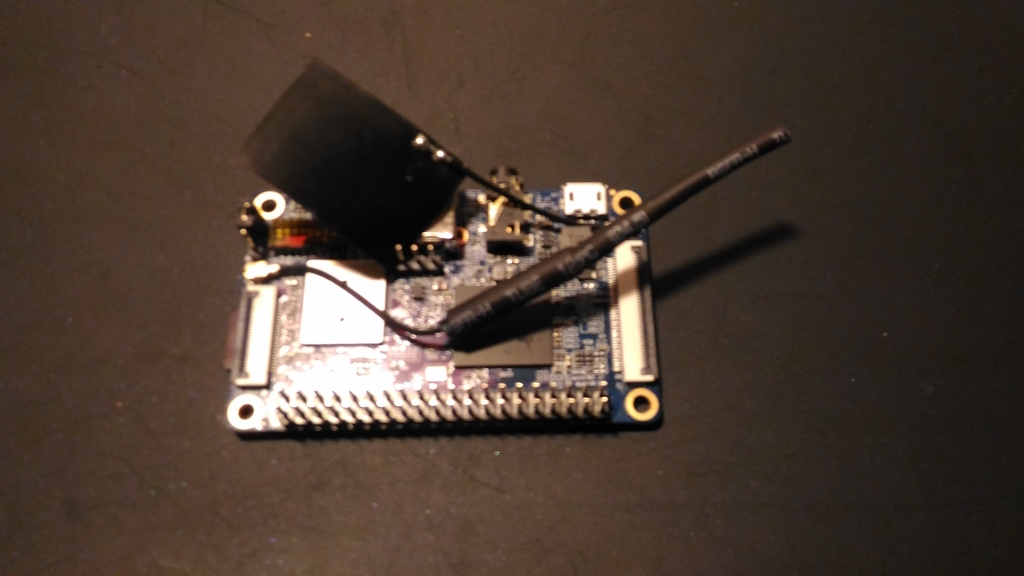
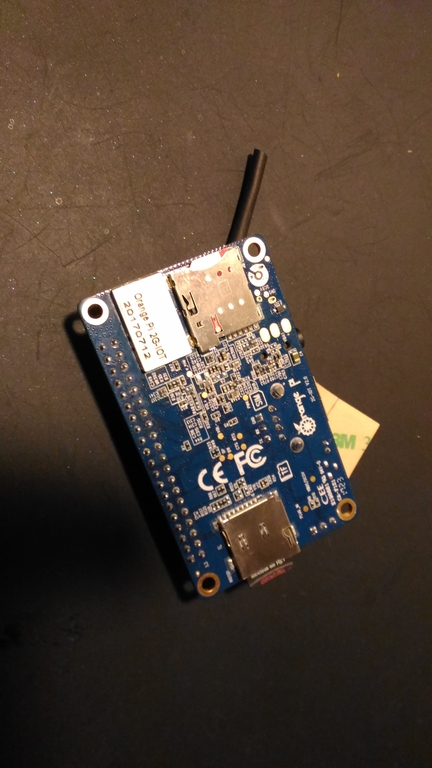
Recently I got myself a GPS module to play with such as this. Not that I knew much about but felt like something nice to play with. First thing first is connecting the GPS module to the GPIO in Orange Pi 2G. In my case I decided to connect the GPS to ttyS2, asides from VCC (2.8V) and GND. This correspond to pins 1, 6, 8 and 10.
Vcc -> pin 1
GND -> pin 6
TxD -> pin 8
RxD -> pin 10

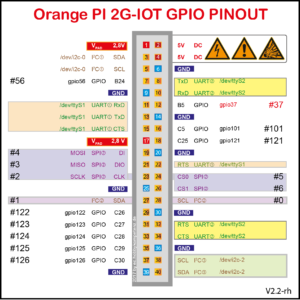
Pin 1 would be the one just below a small white arrow to the left of the SD card. Below two pictures of GPS connected to Orange Pi GPIO pins.


Another important thing is to cross TxD and RxD cables, that means connecting GPS TxD to Orange Pi RxD and GPS RxD to Orange Pi TxD.
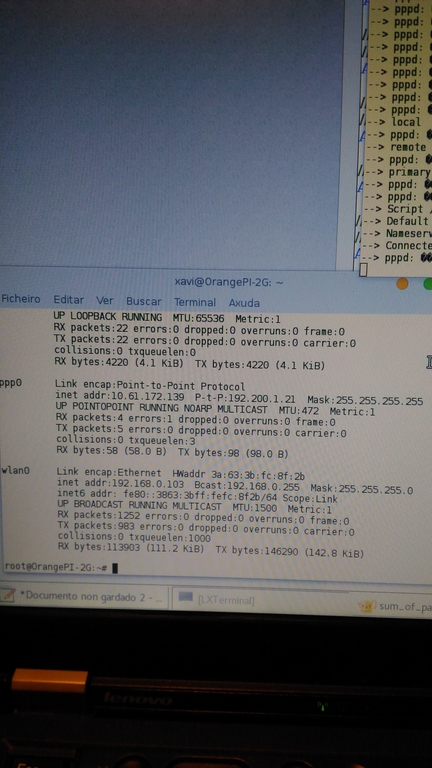
Now that the GPS module is connected to the Orange Pi power it up and log into it. We will now check if the GPS mocule is working, in order to do this we will connect via minicom.

minicom -D /dev/ttyS2 -b 9600
Welcome to minicom 2.7

OPTIONS: I18n 
Compiled on Apr 26 2017, 00:45:18.
Port /dev/ttyS2, 19:10:00

Press CTRL-A Z for help on special keys

$GPRMC,191013.00,A,4252.31265,N,7833.00897,W,0.180,,040518,,,A*64
$GPVTG,,T,,M,0.180,N,0.333,K,A*29
$GPGGA,191013.00,4252.31265,N,7833.00897,W,1,06,2.16,296.4,M,51.3,M,,*44
$GPGSA,A,3,22,16,10,08,26,27,,,,,,,3.81,2.16,3.14*04
$GPGSV,3,1,10,01,19,244,,08,60,313,24,10,49,079,28,16,36,164,36*74
$GPGSV,3,2,10,18,42,250,22,20,07,038,,21,06,061,,22,09,195,30*7A
$GPGSV,3,3,10,26,09,158,30,27,69,072,27*70
$GPGLL,4252.31265,N,7833.7897,W,191013.00,A,A*7C

Continue reading

Fixing fail2ban

I had installed fail2ban but had noticed it wasn’t working blocking ssh brute force attacks. Attacks such as below.

grep sshd /var/log/auth.log | tail
Apr 29 08:06:17 sd-229337 sshd[20646]: pam_unix(sshd:auth): check pass; user unknown
Apr 29 08:06:17 sd-229337 sshd[20646]: pam_unix(sshd:auth): authentication failure; logname= uid=0 euid=0 tty=ssh ruser= rhost=211-75-3-35.hinet-ip.hinet.net
Apr 29 08:06:18 sd-229337 sshd[20646]: Failed password for invalid user db2inst from 211.75.3.35 port 52724 ssh2
Apr 29 08:06:19 sd-229337 sshd[20646]: Connection closed by 211.75.3.35 [preauth]
Apr 29 08:18:21 sd-229337 sshd[20711]: pam_unix(sshd:auth): authentication failure; logname= uid=0 euid=0 tty=ssh ruser= rhost=59-120-243-8.hinet-ip.hinet.net  user=root
Apr 29 08:18:25 sd-229337 sshd[20711]: Failed password for root from 59.120.243.8 port 34312 ssh2
Apr 29 08:18:25 sd-229337 sshd[20711]: Connection closed by 59.120.243.8 [preauth]
Apr 29 08:19:14 sd-229337 sshd[20713]: pam_unix(sshd:auth): authentication failure; logname= uid=0 euid=0 tty=ssh ruser= rhost=195-154-136-62.rev.poneytelecom.eu  user=root
Apr 29 08:19:16 sd-229337 sshd[20713]: Failed password for root from 195.154.136.62 port 24329 ssh2
Apr 29 08:19:16 sd-229337 sshd[20713]: Connection closed by 195.154.136.62 [preauth]

In order to fix this we need to modify /etc/fail2ban/filter.d/common.local and modify bsd_syslog_verbose entry. Substitute __bsd_syslog_verbose = (<[^.]+\.[^.]+>) for __bsd_syslog_verbose = (<[^.]+ [^.]+>).

grep bsd_syslog_verbose /etc/fail2ban/filter.d/common.local
#__bsd_syslog_verbose = (<[^.]+\.[^.]+>)
__bsd_syslog_verbose = (<[^.]+ [^.]+>)
__prefix_line = \s*%(__bsd_syslog_verbose)s?\s*(?:%(__hostname)s )?(?:%(__kernel_prefix)s )?(?:@vserver_\S+ )?%(__daemon_combs_re)s?\s%(__daemon_extra_re)s?\s*

Restart fail2ban and you shall now see IPs performing brute force attacks being blocked as below.

tail -30 /var/log/fail2ban.log | grep actions
2018-04-29 18:43:19,835 fail2ban.actions[28271]: WARNING [ssh] Unban 163.172.159.119
2018-04-29 18:43:20,742 fail2ban.actions[28519]: INFO    Set banTime = 1800
2018-04-29 18:43:20,936 fail2ban.actions[28519]: INFO    Set banTime = 600
2018-04-29 18:43:59,119 fail2ban.actions[28519]: WARNING [ssh] Ban 171.244.27.195
2018-04-29 18:46:05,286 fail2ban.actions[28519]: WARNING [ssh] Ban 5.188.10.185
2018-04-29 19:13:59,938 fail2ban.actions[28519]: WARNING [ssh] Unban 171.244.27.195
2018-04-29 19:14:50,026 fail2ban.actions[28519]: WARNING [ssh] Ban 171.244.27.195
2018-04-29 19:15:35,102 fail2ban.actions[28519]: WARNING [ssh] Ban 159.65.10.166
2018-04-29 19:16:06,167 fail2ban.actions[28519]: WARNING [ssh] Unban 5.188.10.185
2018-04-29 19:44:50,740 fail2ban.actions[28519]: WARNING [ssh] Unban 171.244.27.195
2018-04-29 19:45:35,821 fail2ban.actions[28519]: WARNING [ssh] Unban 159.65.10.166
2018-04-29 19:45:38,858 fail2ban.actions[28519]: WARNING [ssh] Ban 171.244.27.195

But why is this happening? It is because of regular expressions. The way logs are being written it will never find a match with the original __bsd_syslog_verbose. Below script test both bsd_syslog_verbose settings. Originally we needed to have a ., but in reality we have a space in our logs, so we need to modify bsd_syslog_verbose.

#!/usr/bin/env python

import re

testline = 'May 13 06:24:36'

match = re.search('[^.]+\.[^.]+', testline)
if match:
    print 'Found:', match.group()
else:
    print 'Not found for bsd_syslog_verbose=[^.]+\.[^.]+'

match = re.search('[^.]+ [^.]+', testline)
if match:
    print 'Found:', match.group()
else:
    print 'Not found for bsd_syslog_verbose=[^.]+ [^.]+'

And we execute:

 python regex.py 
Not found for bsd_syslog_verbose=[^.]+\.[^.]+
Found: May 13 06:24:36

More info here and some instructive regex google doc.

Pepephone 2G on Orange Pi 2G IOT

Recently I bought an Orange Pi 2G IOT. Pretty decent for $10 I would say, not a lot or RAM or CPU, but the interesting thing from my point of view is the 2G modem. Some pictures below with SIM card installed.


So the idea of this post is how to configure this device to connect to Pepephone network with a PIN on SIM. After some testing I finally came up with below wvdial.conf which works for me.

[Dialer defaults]
Modem = /dev/modem0
Baud = 30720000
Dial Command = ATDT
Init1 = ATE1
Init2 = AT+CPIN="XXXX"
Init3 = AT+CFUN=1
Init4 = AT+CGATT=1
Init5 = AT+CGDCONT=1,"IP","gprs.pepephone.com","",0,0
FlowControl = CRTSCTS
Phone = *99#
Username = " "
Password = " "
Stupid Mode = 1
Auto Reconnect = on

Pin entry above should be replaced with your SIM pin.
Execute running wvdial from cli and you should be able to see a new interface named ppp0. Below is a screenshot of both interfaces ppp0 and wlan0.More info here (in spanish).

Script to place in DMZ

So I had to place a small server in my home DMZ leaving it opened to the whole world with the corresponding risks this has. Wondering how to allow access from my home LAN I came up with the following iptables script.

#!/bin/bash

IPTABLES=/sbin/iptables
INT=eth0

startiptables() {
	if [ ${UID} -eq 0 ]; then
		${IPTABLES} -A INPUT -i ${INT} -s 192.168.1.0/24 -j ACCEPT
		${IPTABLES} -A INPUT -i ${INT} -m state --state RELATED,ESTABLISHED -j ACCEPT
		${IPTABLES} -A INPUT -i ${INT} -j REJECT
	else
                echo "Your UID is: ${UID}. Execute as superuser please"
        fi
}

stopiptables() {
	if [ ${UID} -eq 0 ]; then
		${IPTABLES} -F
		${IPTABLES} -L
	else
                echo "Your UID is: ${UID}. Execute as superuser please"
        fi
}

statusiptables() {
	if [ ${UID} -eq 0 ]; then
		${IPTABLES} -L
	else
		echo "Your UID is: ${UID}. Execute as superuser please"
	fi
}

case "$1" in
	start)	startiptables ;;
	stop)	stopiptables ;;
	status) statusiptables ;;
	*) echo "usage: $0 start|stop|status" >&2
		exit 1
		;;
esac

Pretty simple as you can see. It will allow all connections from inside home LAN and block all unrelated traffic coming from the public, except the related and established ones. Substitute the classic class C on script for your corresponding home/work network.

Setting replication MySQL version 5.5

So the other day I performed an upgrade of MySQL on a linode and notice that it wont start if I kept my old my.cnf file.

[11:47:06] user@linode1: ~ $ echo 'SHOW VARIABLES LIKE "%version%";' | mysql -u username -ppassword | grep innodb
innodb_version  5.5.31
[11:47:20] user@linode1: ~ $ 
131022 08:17:56 mysqld_safe Starting mysqld daemon with databases from /var/lib/mysql
131022  8:17:56 [ERROR] An old style --language value with language specific part detected: /usr/share/mysql/english/
131022  8:17:56 [ERROR] Use --lc-messages-dir without language specific part instead.
131022  8:17:56 [Note] Plugin 'FEDERATED' is disabled.
131022  8:17:56 InnoDB: The InnoDB memory heap is disabled
131022  8:17:56 InnoDB: Mutexes and rw_locks use GCC atomic builtins
131022  8:17:56 InnoDB: Compressed tables use zlib 1.2.7
131022  8:17:56 InnoDB: Using Linux native AIO
131022  8:17:56 InnoDB: Initializing buffer pool, size = 128.0M
131022  8:17:56 InnoDB: Completed initialization of buffer pool
131022  8:17:56 InnoDB: highest supported file format is Barracuda.
131022  8:17:56  InnoDB: Waiting for the background threads to start
131022  8:17:57 InnoDB: 5.5.31 started; log sequence number 1678395
131022  8:17:57 [ERROR] /usr/sbin/mysqld: unknown variable 'master-host=192.168.140.120'
131022  8:17:57 [ERROR] Aborting

Thing is the replication entries in my.cnf need to be removed/commented out and salve needs to be set up from MySQL console.

So here is my new my.cnf.

[11:34:25] xavi@linode1: ~ $ sudo grep -v “^#” /etc/mysql/my.cnf | grep -v “^$”

[client]
port            = 3306
socket          = /var/run/mysqld/mysqld.sock
[mysqld_safe]
socket          = /var/run/mysqld/mysqld.sock
nice            = 0
[mysqld]
server-id       = 2
user            = mysql
pid-file        = /var/run/mysqld/mysqld.pid
socket          = /var/run/mysqld/mysqld.sock
port            = 3306
basedir         = /usr
datadir         = /var/lib/mysql
tmpdir          = /tmp
language        = /usr/share/mysql/english
skip-external-locking
bind-address            = 192.168.137.234
key_buffer              = 16M
max_allowed_packet      = 16M
thread_stack            = 128K
thread_cache_size       = 8
myisam-recover          = BACKUP
query_cache_limit       = 1M
query_cache_size        = 16M
expire_logs_days        = 10
max_binlog_size         = 100M
[mysqldump]
quick
quote-names
max_allowed_packet      = 16M
[mysql]
[isamchk]
key_buffer              = 16M
!includedir /etc/mysql/conf.d/

[11:34:37] xavi@linode1: ~ $

We load the above file or similar depending on your configuration. Now to configure slave we log into the MySQL CLI.


mysql> STOP SLAVE;
mysql> CHANGE MASTER TO MASTER_HOST=’192.168.140.120′, MASTER_USER=’replication-user’, MASTER_PASSWORD=’password’, MASTER_LOG_FILE=’mysql-bin.000747′, MASTER_LOG_POS=75797;
mysql> START SLAVE;
[/text]

That’s it.