Tag Archives: GNU

Project Euler problem 30

Below is the solution to problem 30 from Project Euler. It’s written in Python, a programming language I’m trying to learn.

#!/usr/bin/env python 
# Project Euler problem 30

narc_sum = 0
for number in range(100, 200000):
        # Transform the number into a string
        string = str(number)
        # Transform the string into a list
        lst = list(string)
        sum = 0 
        for i in range(len(lst)):
                # Add the members of the list to the fifth power
                sum = sum + (int(lst[i])**5)
        if (number == sum):
                # Add all numbers and store in narc_sum value
                narc_sum = narc_sum + number
                print "Sum is ",narc_sum

Notify-send command

So the other day I was looking around and discovered the notify-send command. It basically sends notifications to the desktop. Pretty useful now adays.

[11:49:13] xavi@thinkpad: ~ $ sudo dpkg -S `which notify-send`
libnotify-bin: /usr/bin/notify-send
[11:49:15] xavi@thinkpad: ~ $

It is installed with libnotify-bin via aptitude.

[11:50:35] xavi@thinkpad: ~ $ sudo aptitude install libnotify-bin

So, once installed lets create a practical script. On my job I need to have a permanente VPN connection. Once in a while the VPN connection drops and we have to connect again. Lets create a simple script that notifies us when the connection drops.

#!/bin/bash

# Check tunnel interface
while "true"; do
        /sbin/ifconfig tun0 &> /dev/null
        while [ $? -ne 0 ]; do
                notify-send -t 5000 "VPN" "VPN is down"
        done
        sleep 300
done

We save and copy the script, give it execution permissions with chmod and send it to background.

[11:55:47] xavi@thinkpad: ~ $ chmod +x /tmp/check-vpn.sh; /tmp/check-vpn.sh &
[1] 15613
[12:00:43] xavi@thinkpad: ~ $

Here is a screenshot of it working.

vpn notify-send

Enjoy.

Checking connections on a particular service

So lets say you want to see how many established connections we have on a particular port/service. Most of the people would use netstat, however I prefer ss.

On a Debian based system ss can be installed with the iproute package.

user@server: ~ $ sudo dpkg -S `which ss`
iproute: /sbin/ss
user@server: ~ $

On a Red Hat based system it will be installed with iproute too.

[user@redhat ~]# sudo rpm -qf `which ss`
iproute-2.6.18-11.el5
[user@redhat ~]#

aptitude install iproute and yum install iproute will install the package on a Debian and Red Hat system respectively.

Now lets show some examples. Lets say we want to see how many established ssh connections there are.

[user@redhat ~]# sudo ss -t '( sport = :22 )'
State Recv-Q Send-Q Local Address:Port Peer Address:Port
ESTAB 0 0 ::ffff:10.40.7.12:ssh ::ffff:10.16.241.194:56325
ESTAB 0 0 ::ffff:10.40.7.12:ssh ::ffff:10.16.241.194:53804
ESTAB 0 0 ::ffff:10.40.7.12:ssh ::ffff:10.16.241.194:60486
ESTAB 0 0 ::ffff:10.40.7.12:ssh ::ffff:10.14.17.48:37471
ESTAB 0 0 ::ffff:10.40.7.12:ssh ::ffff:10.16.241.194:57982
ESTAB 0 0 ::ffff:10.40.7.12:ssh ::ffff:10.16.241.194:57525
ESTAB 0 304 ::ffff:10.40.7.9:ssh ::ffff:10.14.17.22:46376
ESTAB 0 0 ::ffff:10.40.7.9:ssh ::ffff:10.16.241.28:42654
ESTAB 0 0 ::ffff:10.40.7.9:ssh ::ffff:10.16.241.12:36276
ESTAB 0 0 ::ffff:10.40.7.9:ssh ::ffff:10.16.241.8:57936
ESTAB 0 0 ::ffff:10.40.7.9:ssh ::ffff:10.16.241.28:42855
[user@redhat ~]#

-t displays all TCP sockets

You can also substitute the port number by the name of the service that runs in it by default.

user@debian:~$ sudo ss -t '( sport = :mysql )'
State Recv-Q Send-Q Local Address:Port Peer Address:Port
ESTAB 0 0 192.168.140.121:mysql 192.168.137.234:35512
user@debian:~$

To see all opened ports on the server use the -a option.

xavi@linode2:~$ sudo ss -t -a
State       Recv-Q Send-Q                   Local Address:Port       Peer Address:Port   
LISTEN      0      5                                    *:nrpe              *:*       
LISTEN      0      50                     192.168.140.121:mysql             *:*       
LISTEN      0      8                                    *:pop3              *:*       
LISTEN      0      8                                    *:imap2             *:*       
LISTEN      0      128                                 :::www              :::*       
LISTEN      0      128                                  *:ssh               *:*       
LISTEN      0      128                                 :::ssh              :::*       
LISTEN      0      100                                  *:smtp              *:*       
LISTEN      0      128                                 :::https            :::*       
TIME-WAIT   0      0               ::ffff:173.255.231.252:www          ::ffff:79.158.142.28:55032   
ESTAB       0      0                      192.168.140.121:mysql               192.168.137.234:35512  
ESTAB       0      48                     173.255.231.252:ssh                 79.158.142.28:48395   
TIME-WAIT   0      0               ::ffff:173.255.231.252:www          ::ffff:79.158.142.28:55033   
TIME-WAIT   0      0               ::ffff:173.255.231.252:www          ::ffff:173.255.231.252:37223 
xavi@linode2:~$

I believe ss command is simpler to use but less known than netstat. Enjoy.

Connecting GNS3 simulator to the Internet (part 2)

So now we need to configure a cloud to connect GNS3 to the laptop. We should already have tap0 up and running and IPtables configured to allow traffic as seen on the previous post.

Below is a network topology diagram.
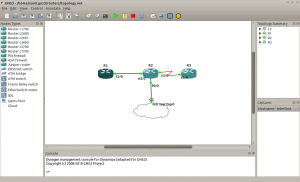

GNS3 topology

We need to create the cloud connecting it to tap0 interface. For that we edit the .net file containing the topology and add the following.


[[ROUTER R2]]
model = 3640
console = 2002
aux = 2108
cnfg = configs/R2.cfg
slot0 = NM-1FE-TX
f0/0 = nio_tap:tap0
slot1 = NM-4T
s1/0 = R3 s1/0
slot2 = NM-1E
e2/0 = R1 f2/0
slot3 = NM-16ESW
x = -21.0
y = -61.0

and for the cloud

[[Cloud C2]]
x = -63.8566172588
y = 84.919044975
connections = R2:f0/0:nio_tap:tap0

Now save the configuration and restart GNS3.

Now there should be connectivity to the gateway (192.168.1.1). To connect to the internet add a default gateway.

Router2#conf t
Enter configuration commands, one per line. End with CNTL/Z.
Router2(config)#ip rou
Router2(config)#ip route
Router2(config)#ip route 0.0.0.0 0.0.0.0 192.168.1.1
Router2(config)#do sh ip route
Codes: C – connected, S – static, R – RIP, M – mobile, B – BGP
D – EIGRP, EX – EIGRP external, O – OSPF, IA – OSPF inter area
N1 – OSPF NSSA external type 1, N2 – OSPF NSSA external type 2
E1 – OSPF external type 1, E2 – OSPF external type 2
i – IS-IS, su – IS-IS summary, L1 – IS-IS level-1, L2 – IS-IS level-2
ia – IS-IS inter area, * – candidate default, U – per-user static route
o – ODR, P – periodic downloaded static route

Gateway of last resort is 192.168.1.1 to network 0.0.0.0

172.16.0.0/16 is variably subnetted, 2 subnets, 2 masks
C 172.16.0.0/30 is directly connected, Ethernet2/0
D 172.16.0.0/16 is a summary, 00:18:32, Null0
10.0.0.0/8 is variably subnetted, 2 subnets, 2 masks
C 10.0.0.0/30 is directly connected, Serial1/0
D 10.0.0.0/8 is a summary, 00:18:32, Null0
192.168.1.0/30 is subnetted, 1 subnets
C 192.168.1.0 is directly connected, FastEthernet0/0
S* 0.0.0.0/0 [1/0] via 192.168.1.1
Router2(config)#

We can see the connectivity below.

Connectivity to the internet

Also don’t forget to add the routes on your Linux box for the other routers.

[11:07:13] xavi@lstkco14073: ~ $ sudo ip route add 172.16.0.0/30 dev tap0
[11:07:49] xavi@lstkco14073: ~ $ sudo ip route add 10.0.0.0/30 dev tap0
[11:08:13] xavi@lstkco14073: ~ $ netstat -nr | grep tap
10.0.0.0 0.0.0.0 255.255.255.252 U 0 0 0 tap0
172.16.0.0 0.0.0.0 255.255.255.252 U 0 0 0 tap0
192.168.1.0 0.0.0.0 255.255.255.0 U 0 0 0 tap0
[11:08:21] xavi@lstkco14073: ~ $ ping -c 3 10.0.0.1
PING 10.0.0.1 (10.0.0.1) 56(84) bytes of data.
64 bytes from 10.0.0.1: icmp_req=1 ttl=255 time=19.9 ms
64 bytes from 10.0.0.1: icmp_req=2 ttl=255 time=3.12 ms
64 bytes from 10.0.0.1: icmp_req=3 ttl=255 time=6.61 ms

— 10.0.0.1 ping statistics —
3 packets transmitted, 3 received, 0% packet loss, time 2001ms
rtt min/avg/max/mdev = 3.122/9.878/19.901/7.229 ms
[11:08:39] xavi@lstkco14073: ~ $

That would be all. Comments and suggestions are more than welcome. 🙂